Last updated on: October 26, 2023
Ever wished you could practice pickleball anytime you want in your own backyard? Well, now you can!
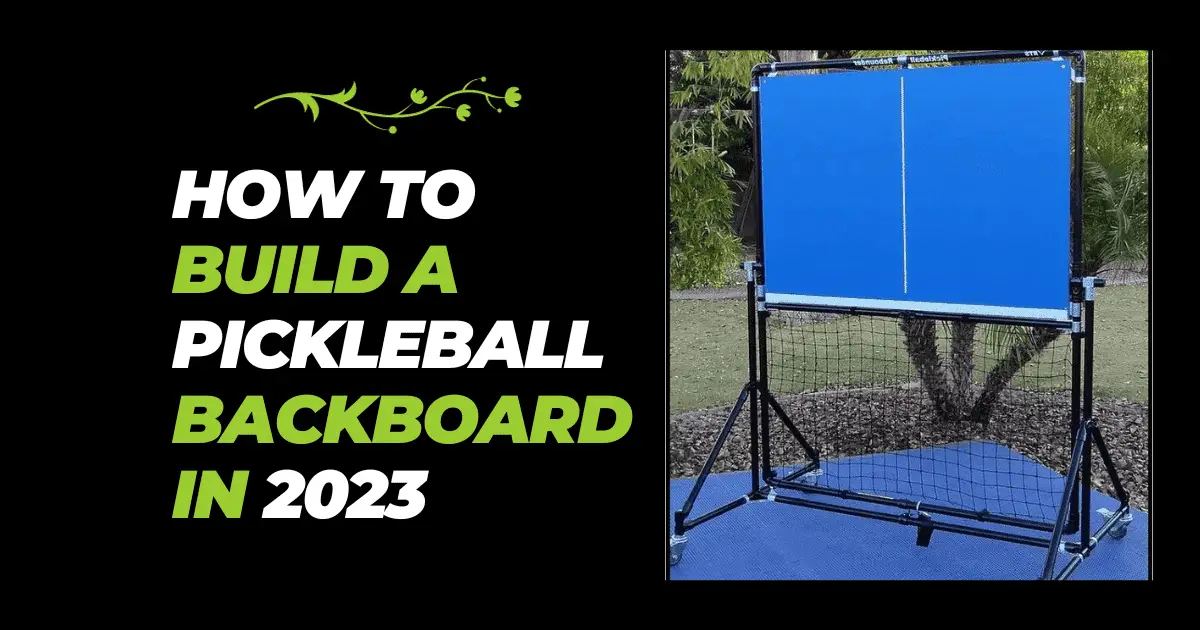
Constructing your own DIY pickleball backboard is easy and allows you to sharpen your skills close to home. No more waiting for a court or finding a partner.
This article will walk you through everything you need to know to build your own high-quality backboard. You’ll learn:
✅ Backboard dimensions and materials
✅ Step-by-step construction
✅ Painting and installation
✅ Drills and practice tips
Why Have a Pickleball Backboard?
Here are some of the key benefits of having your own DIY pickleball backboard at home:
- Get in extra practice any time it’s convenient for you
- Improve consistency as you can repeatedly hit the same shots
- Work on problem shots like backhand, volleys, overheads
- Practice dinking and dropping shots close to the net
- Alternate fast topspin drives with soft touch shots
- Mimic playing against a variety of shot speeds and styles
- Develop muscle memory for key strokes and footwork
- Have fun playing against yourself when you can’t find a partner!
Pickleball Backboard Dimensions
Recommended dimensions for a DIY pickleball backboard are:
- Width – 22 feet
- Height – 4 feet
- Depth – 4 inches thick
This allows you to practice the full width of pickleball court dimensions (20 feet wide). The 4 foot height allows practice of lobs and overheads.
Materials Needed
You’ll need the following materials to build your pickleball backboard:
- 1-2 large MDO plywood sheets (thickness of at least 3/4 inch)
- 2×4 stud lumber for frame (two 8 foot and two 4 foot pieces)
- Exterior wood screws
- Exterior wood glue
- Painter’s tape
- Exterior primer & paint
Optional materials:
- Paddleboard paint for colorful designs
- Pickleball vinyl decals/stickers
- Polyurethane finish for extra protection
Tools you’ll need:
- Circular saw or table saw
- Miter saw
- Electric drill and drill bits
- Level
- Paintbrushes and roller
- Sandpaper
- Safety equipment (goggles, respirator mask, etc.)

Step-by-Step Build Instructions
Follow these steps to build your own pickleball backboard:
1. Cut the plywood
Use a circular saw or table saw to cut your plywood sheet down to size. You’ll want your finished dimensions to be about:
- Width – 22 feet
- Height – 4 feet
Cut two sheets to 4 feet x 11 feet. Cut two pieces of 2×4 lumber to 11 feet long – these will frame the sides.
2. Build the frame
Take the 4 foot pieces of 2×4 lumber and attach them horizontally to the 11 foot 2x4s using exterior wood screws. This will create a 22 foot wide by 4 foot high frame.
Use a level to ensure the frame is square. Drill pilot holes to prevent the wood from splitting.
3. Attach the plywood
Place one plywood sheet on the back of the frame. Make sure edges are flush before screwing into place using exterior wood screws every 12 inches or so around the edges.
Repeat for second plywood sheet on front of frame.
4. Fill any gaps
Use exterior wood glue in any gaps between the plywood sheets and 2×4 frame. Let dry completely. Sand any dried drips smooth.
5. Prime and paint
Wipe surface to remove any dirt or dust. Apply 2-3 thin coats of exterior primer, letting dry between coats.
For your topcoat, use 2-3 coats of exterior latex paint. For extra fun, use paddleboard paints in bright colors and designs. Let dry fully between coats.
Consider adding pickleball decals, painted lines, or stenciled designs. Use painter’s tape for crisp edges.
6. Apply polyurethane (optional)
For extra protection, apply 2-3 thin coats of clear exterior polyurethane. This will protect your paint job from fading and allow for easier future cleaning.
7. Mount and install
Determine placement for your backboard and install securely to a wall, fence, or free standing frame built with 4×4 posts.
Use lag bolts and washers to mount the backboard frame to your chosen surface or supporting posts. Make sure the mounting points are sturdy and reinforced as needed.
Pickleball Backboard Placement
When determining where to place your DIY backboard, here are some things to consider:
- Mount against a garage wall, solid fence, or wall of your house if possible. This will provide the most consistent ball bounce back.
- Face the backboard north or south to avoid glare from the rising or setting sun.
- Angle slightly away from ground level to allow balls to bounce back more cleanly.
- Allow 20+ feet of clearance in front of backboard for play space.
- Position out of the way of other lawn activities and landscaping.
- For portable mounting, build free standing frame following the dimensions of a half or full pickleball court.
Backboard Drills and Practice Tips
Here are some ways to make the most of your new DIY pickleball backboard:
- Warm up with forehand and backhand groundstrokes, focusing on form
- Practice volleys and overheads – alternate swinging volleys with punch volleys
- Work on dropping shots that just clear the net from close range
- Drill serves and service return targeting different quadrants
- Play out points pretending you have an opponent on the other side
- Try tricks shots like behind-the-back and between-the-legs
- Challenge yourself to hit a variety of shots consecutively without missing
- Play games against the backboard like “21” – first to 21 points wins!
Pickleball Backboard FAQs
Here are answers to some frequently asked questions about building and using pickleball backboards:
What material is best for a backboard?
The best material is MDO (medium density overlay) plywood at least 3/4 inches thick. Avoid OSB board as it has poor weather resistance.
What size should I make my backboard?
Make it 22 feet wide x 4 feet tall to allow practice of full court width shots.
How far off the ground should the bottom be?
12-18 inches above ground allows space for ball bounce and clearance.
What is the best way to mount the backboard?
Lag bolts into wall studs or posts offer the most secure mounting. Consider extra bracing.
What kind of paint should I use?
Exterior latex paint provides good durability. For extra protection, use paddleboard paint or add polyurethane finish.
What angle should the backboard be?
A 15-30 degree angle away from the ground improves ball bounce.
How much space is needed in front of the backboard?
Allow at least 20 feet for play space so you can hit a variety of shots.
Can I build a portable backboard?
Yes, build a free standing frame with 4×4 posts following pickleball court dimensions.
What type of plywood should I use?
3/4 inch thick, exterior grade plywood like BCX, CCX or marine plywood are ideal choices. Avoid thin plywood prone to warping.
How far should I place the backboard from playing area?
For safety, allow 15+ feet behind baseline for swing room. Position centered across your width of play.
What if I don’t want permanent concrete mounting?
Construct a portable A-frame with heavy-duty caster wheels. Secure to fence posts when in use. Store away when done.
How do I prevent backboard damage from balls?
Attach a ball catcher net below or small fencing wire. Add pickling paint protection. Leave space behind to catch balls.
What maintenance is required?
Re-paint as needed to cover scratches or wear. Check hardware screws/bolts periodically to tighten if loose.
Now you’ll be able to practice your strokes and improve your game any time. Grab your paddle and start playing against your new backboard today! Let the fun and fitness begin!


